OksneBlog

Sunday, July 29, 2018
Master Bath Tile


Tor has been hard at work in the master bath again. The vanity was installed about a week ago. I was so excited about this that I organized all of our heath and beauty supplies as soon as he had the drawers put together. The backsplash isn't complete because the quartz installers cut it wrong. It is going to mimic the same backsplash as in the kitchen. The tub is amazing too. Although it wasn't installed early enough for me to labor at home it is lots of fun to take baths in with with our little guy. He loves his bath toys which are also a welcoming addition to our master bath decor. As I type this, Tor is outside putting together the mirror. You know us, we can't just buy something pre-made!
The vanity is from Ikea. It is actually two vanities put together with quartz. We added the wood strip because we chose to skip the Ikea sinks. This meant that the plumbing would hang too low causing the top drawer to not shut. Tor had to custom cut out the top drawer a little so we wouldn't lose so much storage space. The laundry room is nearly complete as well. We still need to install the pocket door. I highly recommend that if you still drag all of your laundry downstairs to wash it and have the means to move it up to the same level as your bedrooms you should move it!! It makes laundry so much less of a chore. I can throw my clothes in the dirty basket right as I hop in the shower. We used the quartz countertop in here as well as the same sink as the kitchen. Tor still has to install the last door, but I spent the better part of my day installing the shelving in all of the cabinets and then organizing the storage. We will use this space for cleaning products, linens, and misc household supplies like light bulbs. I am so happy to finally be nesting in some of these spaces. One of the best parts is that I am accumulating a boat load of stuff to take to the donation center as I sort through and organize. It feels amazing to declutter. We all know that there is stuff in our house that we rarely use.
Monday, February 19, 2018
Master Bath Tile


Yes we are so excited to say that the tile in the master bath is done! I must admit that I didn't think we would get to the master bath for a few years, but we are getting there. When I say we, I mean Tor here because I haven't been helping much these days although I did help with this project a little bit.
Pictured here is Tor working on prepping for the heating element. We used the same floor heating system as we did in the living room.
This is a quick shot showing what it looks like as we walk into the space. There are two closets on the side (note that there is electricity in the room now) as you first walk in. Toilet room is next, followed by the laundry room. Straight ahead is the walk-on shower and the space to the left is where the vanity and tub will be.
Bjorn wanted to go to a movie with his brothers, but got roped into helping with the floor when he got to our house. They never made it to the movie. Here he is helping apply pressure to the waffle wire element. It is important that this is completely flat so that the tile has a nice surface to get set on. Tor rented this roller from Broadway Rental here in the Twin Cities. Also, just another picture of the shower. The cool thing here is the drain at the end. No, Tor did not miss the orange element at the end. The entire floor in the shower is slanted towards the drain along the wall. Tor is really excited about this and spent a lot of time investigating it to get it right.
The tub isn't in the correct location exactly. It won't jet out into the hallway space at all, but for the sake of holding down the orange element it sat there for awhile. Now it is in the bedroom again.
Here is where my effort came in. See all the blue wire? I put all of it in place. It took me three times to get it to time out correctly at the end without any cold spots in the room. This is tricky business because you can't cut the wire and it all needs to be spaced a certain way. Oh by the way, I am seven months pregnant! Sitting on the hard waffle orange stuff, moving around, pushing the wire into place within the little tabs on the orange part was hard to do when I can't move very easily. I was glad to help out and Tor even said that he has never installed heating elements because I have done them all in the house. It is kind of fun to be able to say that.
Tor hated this part. The adhesive to get the blue waterproofing system in place was messy. He still has some on his lower back even though he did this part a few weeks ago. If you ever have to place this yourself, be sure to try to flatten out the blue paper before setting it in place. It kept rolling up which made it hard to work on the next piece. He was up until 4 AM one night trying to finish it before the tile guy was coming.
YES!! THESE THINGS ARE AWESOME. Also YES WE ACTUALLY HIRED SOMEONE TO DO SOMETHING IN OUR HOUSE! Ok so we have hired people before, but our avid readers know it is few and far between. Ok so back to the picture. These little things are levelers and help keep all the tile aligned while the thinset cures. Tor was very worried that the floor would turn out after the fiasco with our kitchen floor the first time we hired someone to install it. He may have been bugging the guy we hired this time a little too much, but the floor did turn out nice.
Another view of the floor in progress. This is amazing to see how perfect it was installed and that my perfectionist husband can feel at ease.
Alas! The finished shower. The fixtures still need to be put in, but otherwise it is complete!
This is the main space in the bathroom. The half wall and unfinished wall will have wood on them like we have in the living room. This was my idea so I am excited to see how it turns out.
A quick look into the laundry room and toilet room from the mail space. The heating thermostat is what is hanging from the wall. One thing worth pointing out in this picture is that we chose to go with tile as our trim work along the bottom. The top edge is a metal piece that gets tucked behind the tile with a nice sleek finish along the top.
Brin did a little photobombing here, but you get the idea. The point of this picture is to showcase the contrast between the tile walk in shower against the "gonna-be" wood wall. It is going to be pretty awesome when it is all finished!
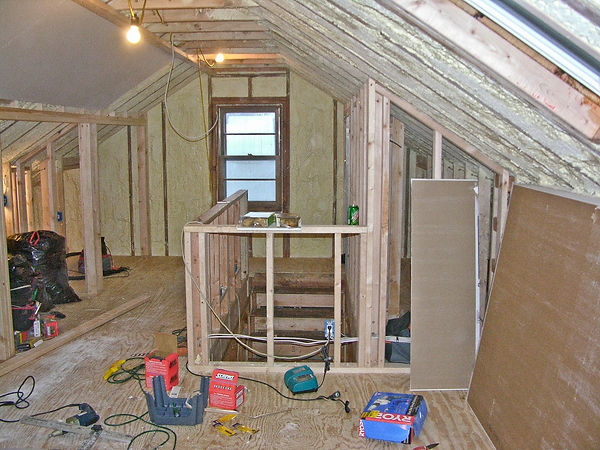
Wednesday, December 27, 2017
Master Bath Insulation and Sheetrock


We continue to make progress on the master bath. I should say Tor does because I am not doing anything these days to help out. We are expecting our first child! The plan is for Tor to get this project completed soon so that we can move into the extra storage space it will bring and make room for a nursery in one of our bedrooms. When you live in a smaller home, storage is so precious and I can't wait to move random things into the closets to the left and right in the first picture below.
Here Tor is prepping for the sheetrock. We finally got rid of the last old window in the house. That is excited all by itself because that thing was gross. It was single pane and was nearly 70 years old. Trying to clean it was a complete waste of time so I rarely ever did. The glass was so scratched that it never looked clean anyway. It certainly seems more real now that we can walk into the space directly. The wall was cut out all the way to the floorboards and the bathroom is actually a step down allowing for higher ceilings. Tor also had to move the outlet so it wouldn't interfere with the door. Mae clearly ins't all that impressed.
This is a picture of the laundry room and a little bit of view of the shower/vanity area. This picture and the following two are post sheetrock before painting. We don't have lighting in these rooms yet so all I could use was a flood lamp from the other room.
This is the view of the bathroom as it would look when walking out of the laundry room or shower. The tub will be where the box is sitting on the far wall. It is hard to tell right now, but behind the leftover sheetrock is an unfinished half wall. We are putting maple veneer there as well as behind the vanity.
This is a shot of what it looks like as you enter from the bathroom. It is hard to get a picture that shows both the walls and the full height of the room. Oh well, I am sure you get the point.
Monday, November 27, 2017
Master Bath (Almost) Ready for Inspection


Hello everyone! We finally have an update for our blog. Tor has been working on the master bath over the last few months getting it ready for the final inspection before insulation goes in and walls go up. We have insulation scheduled for Thursday this week so Tor took work off last week to get everything complete. He still has has a little work to do, but not too much. He had me run to the city this morning to get a new electrical permit. All other building permits don't expire, but the electrical permit does. Bummer on the pocket book a little I guess. Oh well! Here is some of the HVAC coming up. The room on the right is the toilet room and the room on the left is the laundry room.
Mae is getting bigger and no longer needs to jump up on the window to see in.
Here is a shot of the shower. It will have dual shower heads and a slope to the wall under the window where the drain will be. There will also be 2 "bump-ins" between the controls. One for shampoo etc and one for my foot for when I shave my legs.
This is where the dual vanity will be. I was too lazy to move the ladder.\
Laundry hookup. He still needs to get the drainage pan installed too.
Tub hookup on the left. I am excited to see how the tub and other fixtures fill the space.
This is what the room looks like as you enter from the bedroom. It isn't a great shot because all the sheetrock is stacked up right when I crawl through the window.
Monday, June 18th 2017
Master Bath Plumbing and a Walk-In Shower


We have been slacking on the updates lately, but it has been for good reason. The weather has been nice and cabin season is in full swing. Tor has been picking at the house projects off and on as he has time so there has still been some progress. Pictured here is the plumbing in place for the vanity and walk-in shower.
Laundry will be in the upstairs bathroom as well so pictured here is the utility sink plumbing. I am hoping Tor takes a few minutes to add some technical notes in here about it all. For now you will need to settle for what I write!
The shower is one of the coolest features of the new master bath. It will be a dual-head walk in shower that has a linear drain on the back wall. Tor has spent a lot of mental bandwidth trying to figure out how this gets installed, but thinks he finally figured it out.
Here is a close up shot of the linear drain. The floor is sloped so that it will all drain towards the back wall.
The puppy, Mae, is helping showcase the toilet plumbing. The toilet will be behind a pocket door for privacy while the rest of the room will be an open format. This was Mae's first visit to this bathroom, because we still haven't knocked out the wall from the master bedroom to this space. This means we still crawl through the window opening to get in.
Wednesday, March 15, 2017
Master Bath Electricity and a New Puppy!
Wednesday, March 15, 2017
Master Bath Electricity and a New Puppy!


Tor has been hard at work getting the wiring done in the master bath so we can be ready for a contractor come May. Yeah that is right, we will be using a contractor for part of this work. Although we love doing the work on our own, it is going to be nice to have a project get finished quickly. I am already dreaming of a warm bath in the new tub and a glass of wine...yum.
The most important part of this post isn't the wiring of course, it is this cute little lady right here. We have decided to become a family of four and are in the middle of adopting Pittricia Mae. She hasn't been in the new bathroom space yet, but sure is curious. She loves to explore her new home with her sister Brin, but he favorite hobby is snuggling. She fits right in to our family.
Sunday, January 22, 2017
Master Bath Framing
Sunday, January 22, 2017
Master Bath Framing


It has been a long time since I have posted on this page too just like the project on our Garage page from this weekend with the update of the finish work on the door. It doesn't seem possible that the master bath hasn't been touched in almost three years! We have finished almost the entire exterior since then and the kitchen too. Pictured here is the master bath framed out. I am standing in what will be the new laundry room looking out at the common space of the bathroom to the left and the walk-in shower to the right.
This angle shows the extra closet space on the east side of the bathroom. We plan to use this space as extra clothes storage for bulky sweaters and other items that take up significant space.
Pictured here is another closet on the west side of the bathroom as well as the toilet stall. There will be pocket doors on all closets and on the laundry room due to the small space.
This picture shows the layout as you enter the bathroom. Two closets are in the foreground, one to the right and one to the left. The ladder is standing in the toilet stall with the laundry room right after that. Then the shower is in the back left corner. The bathtub will be in the common space just on the other side of the wall of the closet to the left. We plan to hire out the tile work and sheet rock to the same individual who set our kitchen tile. This space is much smaller than the kitchen and already had all the supporting walls so it should be a "quick" project!
Saturday, November 1, 2014
Master Bath Status
Saturday, November 1, 2014
Master Bath Status


This edition of the blog will focus on the current state of the Master Bath.
This is the interior of the bathroom and laundry room. This picture was taken looking through the south-facing window in our bedroom. Currently this window or one of the new exterior windows is the only way to get into this space. I prefer to crawl through this one rather than climbing on top of the roof to get into the bathroom.
As we enter the bathroom there will be two storage areas within the hallway. We plan to keep shoes or potentially extra bedding in these areas. This is the space on the east side facing the street. Both of these spaces will have a pocket door giving access to the space.
This picture is looking back into the house. The window will be cut out to form a walkway into the bathroom. This is the window that I crawl through to get into the space.
Here are a whole lot of pictures from framing more walls in the master bath. This has been an interesting process to help with since the space keeps getting smaller with the more walls we put up. It is turning into a game of Tetris almost. This picture shows Tor and his dad working on one of the south facing walls. Tor did such a great job planning everything out in AutoCAD that he has yet to be wrong on his measurements. He just prints a cut sheet, cuts things, and nails them together. If only everything in life were that simple.
The picture is a little hard to read, but is very important to me so I am going to make sure everyone knows what it says. It states "Anna was right!" I can't remember what it was that I was right about, but the point is that poor Tor had to acknowledge that I was right about something. Tor's dad was at our house at the time and thought it was hilarious to see the two of us banter back and forth and took it upon himself to make it official so he wrote it on a board. This is the first official piece of art in our master bath. It might just have to stay around for a while. I keep finding it turned around or stuck behind other things so I have made a point to put it back on display in a prominent location each time I am helping out. Not going to lie, I like being right and I want everyone to know that I am (at least sometimes).
This is just a picture of a bunch of wood remnants that we have acquired. This isn't all of it either. Our backyard looks a little ridiculous right now.
Here is a picture of the north-facing wall in the master bath. The doorway will be a hallway from our upstairs bedroom to the bathroom with some storage closets in this area.
I took this photo to show the flush header and how the sheathing is getting applied. Tor, his dad, and I held a sheet of sheathing up and used a 2 x 4 as a guide on the top to draw lines and mark exactly where these needed to be cut.
Tor's "cut sheet" with all the dimensions he needs for one of the wall sections.
This picture is of Tor nailing one of the walls together. He would get all of the boards lined up on the bottom plate then I would help keep the exterior boards square while he nailed everything together and kept everything plum. The middle boards were easy to nail in last because we just had to hold them into place.
The south interior wall for the bathroom. The nail gun in in the shower in this photo to help give perspective to the layout.
This past weekend Tor and I put together the gable end wall for the upstairs on the south side. This picture in particular is of Tor nailing down the sheathing. We couldn't reach the middle of the boards near the highest area so we will need to rent some scaffolding to finish this off. Tor would lift it up the ladder to the top of the wall, I would help lift it over the wall and then help guide it into place. It was quite simple because we could rest it on the sheathing from below.
This is just another view of Tor working. It size of the garage is put in better perspective here.
Given the size of the room and the layout of the downstairs in our house we had to get all of the sheetrock up into the bathroom already before we closed it up. Tor invited some friends over Friday for a fire and beer to get this done. Thank you to Pete, Erik H, Erik O, and Cass for helping out. We have two big batches and had to wrap them up in poly since the room isn't enclosed yet. It has rained a couple times since and everything has been just fine. I spent some time nailing in the rest of the east and west walls in. We had run out of nails the other day so these never got finished off. I used the level to draw straight lines up the wall so I knew exactly where to hit a stud.
This is another view of the exterior wall getting finished up.
Here is the wall all finished up. A big thank you goes out to our friends Keshar and Bob for letting us borrow their ladder for most of the summer. The green leg is featured in the bottom left corner of the picture.
Monday, September 15, 2014
Bathroom Walls


There was tremendous progress on the house today. A big thank you to my father in law and brother in law for coming over to help. Also thank you to my mother in law who sent along a crockpot with a roast in it so that we didn't have to make dinner.
I was gone again (I know I am gone all the time, but always for important stuff!) for my brother's wedding shower so 0% credit goes to me today.
Our upstairs bathroom has both the east and west facing walls up and some of the roof rafters.
The center LVL with the rafters tied in and some lighting added so we can work later in the evening.
This is the direction that we will walk when entering the bathroom. It looks so beautiful. I am so proud of my husband. He drew out the plans and printed a copy that showed all of the dimensions on it. He then cut everything just as the printout said and everything fit perfectly.
Saturday, September 6, 2014
Huge Progress!


Sorry for the long delay during posts. We have had a busy schedule lately and much of the work we have done on the house hasn't been all that flattering to blog about. This blog however is pretty cool. You can now see that we have a second floor. We actually have had a number of visitors (neighbors that we don't know) that have come to check out our progress and ask questions. A couple of ladies said they were going to bring their lawn chairs and some beers next time they stop over.
OK, on with the pictures…
The above picture is prepping the post for the LVL to set on. There is an additional 2x6 on the edge of it so that we would have something to balance against the post rather than just holding a heavy LVL in place while trying to nail it down.
Here is the post in place with a few temporary supports added as well.
Tor was pretty proud of this support system. He worked about 1 full day (one night after work and one half day on a weekend) getting this area prepped for the beam. He specifically told me to take a picture of this. You can also see our foam insulation that we had put in 2 years ago.
Here is the LVL in place attached to the hanger and support.
Our friend Pete came over today to help pick this heavy beam into place. He was in the middle of some projects on his own house and took the time to come help. We owe him big time… maybe we can go help him this winter sometime when our project is in a better place.
Tor holding the beam in place while Pete was setting it into the hanger on the other end. I was holding his ladder most of the time, but wanted to get a few pictures taken while I could.
Here is the house with the beam up. Like I said a lot of people have come to check it out. It is cool to see the "footprint" of the house will be rather than just imagining what it will look like when we are done.
When I spoke about our busy schedule one of the things that kept us busy was our 5-year wedding anniversary!!! The picture above is of the card Tor made me. I do a lot of crafts so Tor will dig through my supplies and make me a card once a year. It is what our house will look like when it is done and it is also to scale (of course). One inch represents 10 feet on the house.
Friday, September 5, 2014
Another LVL


I was gone this week for school so I don't have any progression photos, but here are a few I took this weekend when I got back in town. Tor got the floor joists in for the upstairs bathroom above the garage. I put this post under the bathroom page since you can see the layout of the bathroom a little based on how the framing is put together. The shower will be where the boards change direction on the right side of the photo.
He also got the attic ladder framed out. It will allow us to get into the dormers above the garage. We are using this space for extra garage storage.
Tor also got a few pieces of plywood subfloor put down. It really felt different when I got back home and I was actually walking into a "room" rather than walking within a bunch of random boards. Tor even parked his car in there one night. The plumbing that is being used as a placeholder right now is where the bathtub will be.
Saturday, August 17, 2014
Framing the Bathroom Floor


As a follow up from the prior post, I have taken a number of images of our master bedroom as it sits today. There will be more changes to this and I will point them out along the way.
This shows the final view of what the room will look like from this angle. You can see our finished closets on the right and the finished half wall. You would not have been able to see the bed from this angle in the past had the closet stayed in the old spot hanging over the stairwell.
This image shows where I was standing in the prior image. You can see the storage closet on the right which was built due to the ventilation from the kitchen below that passes through this area. There is an additional storage area in the dormer behind this storage with the opening in that little space. The window shown in this picture will become a doorway/hallway to our master bathroom that will be above the new garage. Lastly, you are unable to see it here, but we installed 4 motion sensor lights (two on the half wall upstairs and two in the stairwell) that turn on to allow for lighting at night. These are awesome for when someone needs to get up in the middle of the night to visit the bathroom given currently we only have one bathroom in the house and it is on the ground floor.
Here is a close up view of the closet. The top shelf works well storing heels. There is hanging space on both sides of the shelving holding my sweaters on the right. The doors were actually triple panel bifold doors that we just cut down to two panel.
This shows the finished closet area for both of us and showcases the bifold doors better. Again these used to have three panels and we cut them down to two each.
In our sleeping area we chose a bed frame from Crate & Barrel, nightstands, bedding, and pillows from West Elm and the light fixtures are from Room and Board.
Our dog Brin NEVER poses nicely for pictures so I will always share photos of her like this one given the opportunity.
We had fun picking out furnishings for this space. We chose a bright yellow chair with metallic accent pillow in contrasting textures to add surprise and flare to the room. It also helps balance out some items from our family history that we also used to decorate. I didn't post a clear picture of them here, but you can see a metal milk can that was given to me by my grandmother and once belonged to my great grandfather. What you can't see at all are two yellow vases that were made by my mother. The pillow helps balance out the milk can while the chair adds a more solid foundation for the yellow accent color in the room rather than relying on two small vases for this alone.
The interesting thing to point out in this picture is the dual switch located above the nightstand. Tor loves to listen to his sleep mate at night (a machine that makes noise like a fan, but doesn't actually blow air) and wanted to make it easy to turn on and off from bed. The second switch turns on the outlet below and thus turns on the sleep mate.
We went without dressers for a very long time. We had storage bags under our bed for years housing all of our socks and underoos which made a fun playing ground for our dog when we neglected to zip them closed. We finally chose these Midcentury Modern dressers (and nightstands) from West Elm just last year.
We wanted to keep the decor simple in our bedroom therefore we did minimal decorating. One thing I like most are my jewelry boxes. The boxes themselves look like art pieces, my jewelry adds a little color variation, and since they are see through I am forced to keep my things organized!
This view shows the milk can I referred to on the Art page on the right side. It also shows some artwork that I made myself and really showcases the simple modern finishes we added to the space.
We wanted to put one accent wall in the room and could not agree on which wall it should be. I tried with all my might to talk Tor into putting wallpaper on one accent wall (wallpaper... I know, but you have to admit that there is some cool stuff these days). Tor put his foot down and used one of his vetoes so we agreed on the ceiling. We used a rustic grade maple flooring from Lumber Liquidators on the ceiling and added recessed canned lighting to help open the space. The lighting is on two switches dividing the room in two so that while someone is getting dressed in the morning, the lights can still be off over the sleeping area. This is particularly important when you live in Minnesota where the sun doesn't come up until after you have left for work for many of the winter months.
Tuesday, April 22, 2014
Throwback Project: Master Bedroom - Finished


Wednesday, April 16, 2014
Throwback Project: Master Bedroom - In Progress


While digging around on our laptop, I came across these babies. One of the early projects on our house was to gut and rebuild the upstairs bedroom. Our house is a 1 1/2 story house built post WWII in a small "cookie cutter" suburban area on the outskirts of Minneapolis, MN. The craftsmanship wasn't particularly great with some corners cut along the way. Tor replaced the existing 1x12 shiplap subfloor with 3/4" plywood and re-framed the knee walls. We removed all the old tar paper and straw batt insulation and had 3-1/2" of closed-cell spray foam applied to the underside of the roof sheathing and to the gable end walls (hired out). Several rafters needed to be furred out in order to minimize waviness in the sheetrock applied to the sloped portion of the ceiling. A portion of the original closet was framed over the stair opening, leaving very short clearance while walking down the stairs. The original closet had a large footprint, but did not have much usable space on account of the sloped ceiling. We removed the existing closet and enlarged the stair opening in the floor. Two new closets were framed adjacent to the half-wall, creating a "hallway". Moving the closets to this location created two distinct spaces, the square bedroom, and the closet hallway. Wrapping the half-wall around the end of stair allowed the room to open up and utilize the natural light that comes from the gable windows and the new skylights. The closets are not tall enough for a long dress to hang, but we did put in a hanger bar and shelving to allow for folded clothes and shoes. We just rotate our clothes based on season, but have plans to add storage with the addition this year. Another change that was to put in two skylights. The skylights are made by Velux and were easy to install. Tor and his dad put them in over the course of an afternoon. We did this project post re-roofing so shingles had to be taken out and new ones cut which added work. Our bed is located under these windows, but the windows face west so we don't get the sunrise in our eyes every morning. This image gives us an opportunity for a quick recap of our dormers. Given that this is a 1 1/2 story house, there is obviously space lost when a wall is put up. We use this space for storage and have built in doors within Tor's closet (nearest the window on left) and in the storage closet on the right. Our ventilation system for the kitchen comes up just right of the stairway, which forced us to enclose this area.