OksneBlog

Tuesday, June 21, 2016
We are Cookin' with Gas


It is weird to say it, but the kitchen is FINALLY done! It feels amazing! This post talks through the last few steps we took to get the project finalized. The picture here shows me sanding down maple trim to apply around the exterior of the wood wall. Tor purchased 1x boards and cut them to size. The blade left burn marks along the trim so I sanded it down before applying poly.
Tor took a stub and used it to make sure it would give the look we wanted and cover the rough area left around the edge.
Here is a picture of the final work. The trim is raised 1/8 inch above the maple plywood and bumps right into the finished maple side of the cabinets below. The artwork here was given to us from family during our recent trip to Norway.
We thought it would be great to show some shots of the finished space from different angles. This is the dining area looking south. The light fixture is from Room and Board, table from West Elm, chairs from Overstock.com, candleholder from Target and the table runner is a wedding gift from a Scandinavian Import store no longer in business.
Here is a shot looking west towards the kitchen. The fan is from Big Ass Fans, stools from Kohl's, planter from West Elm and appliances from Warners' Stellian Appliance. We purchased the oven, fridge, and dishwasher from their scratch and dent sale each spring. We saved approximately $2000 from the sale so worth checking out! The oven didn't even have a scratch or dent... they just had too many in stock and sold it for $1000 off. Great deal!
This is a picture looking east giving perspective of the space.
This is the final shot of the cooking space. We love how clean and open the space is and that the windows offer lots of light and natural color in the kitchen. We just love cooking in here and having people over for dinner. The plan is to slowly have everyone over that has helped us on the house so if you haven't been over yet, but helped in some way... expect an invite!
Wednesday, May 11, 2016
Tile Floor Finished - The Right Way

We wanted to give a quick update on the tile floor. Those of you that we talk to regularly had questions about how the floor ended up and how the claim against the first installer is going. The floor looks great and the heating element is amazing! The claim is TBD. We have engaged the MN Office of Attorney General and we are also working on a cease of work claim to the MN Department of Labor and Industry. The picture here shows the tile floor nice and level. The rug is made by TAG and was purchased from Ace Kitchen Place (http://www.acekitchenplace.com) in Decorah, IA. We have also finished the kick plate beneath the cabinets.
Saturday, April 17, 2016
Maple Wrap, Shelving, & Brin's Watering Hole


Over the past few we have been hard at work on the kitchen finishing touches. One of the last major projects left is to wrap all of our Ikea cabinets with maple plywood. We chose to go this route versus purchasing the white Ikea wrap to give out kitchen more of a natural finish. We purchased all the maple veneer plywood from Youngblood Lumber in Minneapolis at (http://www.youngbloodlumber.com). Pictured here is the first sheet being hung on the front backside of the island. Both sides come prefinished so it is easy to find a wood pattern we like.
Here Tor is working on the north side of the island. This side will hold Brin’s water and food bowls. Prior to taking this picture, Tor had already measured, cut, and used the biscuit joiner to prep the area. Here he is inserting glued biscuits.
Here Tor is attaching the front face.
A couple speed clamps are used to secure it in place while the glue dries. The glue is really easy to clean with a damp paper towel followed by a dry one. The veneer finish is smooth and allows any residue to be gently scrubbed off even after it dries.
Tor is ironing on the veneer edge band in this picture. We ended up just using a knife to cut the extra banding off rather than using the tool pictured in an earlier post. This allows for a closer cut to the board.
Here Tor is deciding where to cut the bowl holes. All marks made on the boards have been made on painters tape to keep from making marks on the boards directly.
Here is the finished side of the island. We tucked the microwave under here as well to keep as much counter space open as possible. This idea was replicated from a blog we follow at Chezerbey.com. I took a cool video of the pieces being put together and posted it to my Instagram account @aoksnevad. Pictures can also be found at #oksneblog.
Moving onto the shelving, here is a picture of the first shelf in progress. It shows the holes made by the biscuit joiner for the middle shelf. Tor also marked each board with notes to make sure we knew exactly where to put each board as we glued it together.
Here is the dry run we did for fit. We still needed to put the edging on before we install.
Here is the finished product for the shelf with the under mount lighting being installed. We purchased LED 12 volt Flexible Tape Light by Patriot Lighting at Menards. This product is pretty neat because you can cut it to size and it is easy to install.
Here is a shot of the lighting from below. This product comes with attachments that allow the cut pieces to turn corners too. We have the lights plugged into outlets hidden within the middle top cabinet and are operated by a light switch on the counter curb. The metal valance is just an aluminum angle stock from Home Depot 1/2 by 3/4 inch cut to size and screwed in with 1/2 inch screws.
This is the dry run of the second shelf going in to the left of the oven.
This picture may be one of my favorites of all time. It shows how complicated the shelving system was to put together. Typical for Tor, there wasn't a mistake made. It took 90 biscuits to put this together... I counted them before we started.
Here is the final picture from our work today. Both shelves are up now. We just need to place the maple above the cabinets to connect to the area above the fridge. A small piece goes between the two shelves in front of the hood to cover the cabinet hardware also.
Thursday, March 10, 2016
Countertops & Backsplash


The countertops were installed last week and the backsplash was installed today. It took us a few weeks to decide what we wanted, but ended up going with Vicostone Carrara Quartz (http://us.vicostone.com/en/gallery). The color is fairly white, but looks grey in person against the white cabinets. We liked marble more than granite, but due to the upkeep for marble we felt it would be a bad idea for the kitchen. Wanting to go with the marble look, quartz was the next best option.
The sink got installed by the countertop crew, which was nice because it was less work for us to do. We chose the Kraus KPF-2620SS Modern Mateo Single Lever Pull Down Kitchen Faucet in Stainless Steel and purchased it on Amazon. The sink is Kraus KHU100-32 Professional Kraus 32 Inch Undermount Single Bowl 16 Gauge Stainless Steel Kitchen Sink and purchased it through their own website.
Sunday, March 6, 2016
Let There be Light - On the Wall Progress


The room is finally starting to feel like home. We have had a bunch of "small" projects going on lately. I say "small" because they are in comparison to other projects, but they still take a lot of time to complete properly.
One project we worked on this past weekend was to install the dinning light above the table. Since it is hanging from the accent wood wall, it was important that we get it right the first time. Here Tor had taken the time to tape off the area that he would be cutting the hole into. He used tape to help secure the wood from splintering and so he could mark exactly where he wanted to cut.
Here Tor is cutting the hole. It took quite awhile because he wanted to make sure he cut a smooth opening. The wood is prefinished maple veneer plywood, which means we can't sand without ruining the smooth finish.
Here Tor is installing the light. He was actually already done, but I made him pose for the picture, which is why he has this dopey smile on his face. (Love you honey!)
Moving onto the wall, before we could install the last wall panel over the outlets, we needed to install the maple counter. We used the same maple veneer plywood, but we wanted the front edge to look finished as well. Tor purchased a maple veneer iron-on edging from a local lumberyard. Here he is ironing on the veneer and then trimming it with the trim tool supplied with the edging. This tool trims both the top and bottom off at the same time. It did not clean it off entirely (left a slight lip) so we plan to still do light sanding to see if we can get it flush.
Here is a picture of the finished wall. Tor took an enormous amount of time measuring for the outlets so that the holes could be cut perfectly. When doing this, he again used painter’s tape to mark off the areas and reduce wood splintering.
Monday, February 15, 2016
The Wood Wall


This is a fun project to write about because I was the one to came up with the idea to begin with...The Wood Wall. We were struggling to figure out how to define the dinning area in comparison to the kitchen. We didn't want to paint the walls a different color because we want the space to feel as big as possible so I threw out the idea of putting wood on the wall like we had done in the upstairs bedroom.
To get started, I painted the USB black in the area that will have a reveal between boards.
We purchased pre-finished maple plywood, which is nice because then we don't need to finish it, but it poses a potential problem when trying to get the wood to adhere to the wall and ceiling. Pictured here Tor is scratching the wood on one side to allow the adhesive to connect with unfinished areas on the plywood.
Here Tor and his dad Haakon apply adhesive to the board. We had already marked off areas on the finished side with painters tape so we know exactly where to nail without writing on the board and to keep the wood from splintering from the nailer.
Here Tor and his dad are nailing in the plywood. Haakon is applying pressure where Tor is nailing to keep the impact from the nailer as minimal as possible. We used very small finishing nails to keep the look as clean as possible.
I will continue to post pictures and the project continues!
Sunday, December 20, 2015
Learned a Big Life Lesson


I cannot believe that we have to write about this, but we made a big mistake this past week. We hired a guy to set our tile and he did a terrible job. He does own a company so it isn't like we just hired some random dude off the street and he came highly recommended by a trusted and knowledgeable friend of ours so we didn't do a background check. BIG MISTAKE! Pictured in this post are images of SOME of the mistakes. I emphasize some because there were so many! This picture shows a small level sitting on one tile and how un-level the tile is next to it. This is approximately 3/16 of an inch off.
This picture shows a grout line that is 1/4 inch wide. We asked for a 1/8 grout lines. You can see how skinny the horizontal line next to it is. This line is in a highly visible area along the cabinets.
This is down right stunning. The tile guy didn't even fill underneath the entire tiles. When he came back to inspect it afterwards, he said that he goes back and fills this in. This has got to be the biggest joke of them all... I have no idea which tool is used to fill this back in and ensure that thin set gets within all of the space under here. I have scoured the Internet too and this "process" of his doesn't show up on any tutorials that I have found.
This is another snapshot of a non - 1/8 inch joint.
We are pulling the tile back up because it risks cracking, the grout lines are uneven, the tiles are not level, and the grout color isn't even consistent across the floor. He used the wrong thin set (we specified which kind was needed prior to the work starting) and it shows. The thinset isn't cured because there has been water under the tile and it hardly even sticks to the tiles we pull up. You can see small spots on the broken tile on the big chunks on the left. This also shows that he didn't use the correct size trowel needed for our size tile nor did he back butter the tile. These are rookie mistakes... not something you would expect from someone working in the field for 22+ years.
Lastly, here is a picture of a short cut he took. He put the thin set down in such a way that it wouldn't squeeze up into the cracks thus creating less work for him to do later. The problem is that these gaps can be prone to cracking, will reduce the efficiency of the in-floor heating, and don't allow the tile to adhere to the floor properly. The lesson here is even through we felt like we did our due diligence picking a professional tile installer, there were other steps we should have taken before we let this guy come in out house. Ask for insurance information up front, ask about prior jobs, ask him about his process, vet out references and look them up online.
Sunday, December 13, 2015
Tile Prep and Installation


I have said multiple times in this blog that we have had productive weekends, however this past one may be one of the most productive yet. We were under the gun to get some things done before the tile guys come on Monday therefore we had to keep fighting through. Pictured here is Tor finishing off the back of the island so we know where to put the heating elements. We also built the frame and installed the cabinets on the east side of the room (not pictured).
I took a few quick pictures of the materials that we used for easy reference. We chose a product called Ditra Heat for its ease of installation. I will say, it wasn't difficult to follow the instructions, but it still took what felt like forever to install. I am sure that is true with all products because the products themselves didn't cause any delays, but the process itself and the fact that we have never done this before.
Here is a quick shot of the other important part of the heated floor. We used 3 spools in this space, two in the kitchen and one in the entryway.
Surprisingly Brin enjoyed the new floor. She is usually pretty skittish of anything that is different than the norm, but she kept walking right through the mess. It was nice to have her spend time with us instead of sleeping all day, but it would have been nice to have her do it during a less messy product. Here Tor is spreading the thin-set. We used the VersaBond Grey premium grade.
This is a lot of hard work pictured here. I got to the end of the second spool and I still had 10 feet to use up. The wire cannot be cut to length and must stay in its original condition so I had to get creative while putting the last bits down. The blue wire against the orange underlayment makes for a really cool picture.
Here is a close up picture of the wire. The end of the wire is shown towards the middle of the picture.
This picture shows the initial status of the tile being set. We chose slate grey porcelain 12 x 24 tile and are having it installed in thirds. The tile should take about 4 days to install from start to finish. We are getting closer to our goal to finish the kitchen before Christmas in 10 days!
Sunday, December 6, 2015
Installing Cabinets


We set a goal a few weeks ago to be able to cook breakfast in our kitchen on Christmas Day therefore we are pushing hard to complete the kitchen. To be fair, the goal isn’t to be completely finished given we haven't even picked out the finishings for the entire space, but rather to be able to make a meal comfortably and be able to clean up afterwards (aka without using the bathroom sink!). The projects we worked on this weekend were to install the cabinets and island. Pictured here Tor and his dad are working on leveling the base for the cabinets.
Here are the cabinets along the west and north wall with the exception of the pantry. The pantry will be installed post tile while the rest is installed pre tile. I don't know why, but I have learned that Tor and Haakon are the experts here so I will just follow directions. The pantry will be to the right of the last cabinet on the right side of the picture with the fridge between the two.
Together Haakon and Tor are setting the cabinets on the island base frame. I helped put many of the cabinets together with Haakon, but I messed up some screws on these two that needed to get fixed quick first. The island will have these two cabinets, wrapped in plywood with the microwave tucked under the countertop too on the left side of the cabinets. Below the microwave will be Brin's dog bowls.
Here is what the kitchen looks like as it stands today. The island and the cabinets are installed with the drawers too. I spent the day putting as many dishes away as possible so that we could get them out of the way. There are 4 more 12 inch deep cabinets that will be installed on the other side of the kitchen (where I am standing while taking this picture) to be used for more fancy dishes and perhaps bar items. We purchased the cabinets from Ikea about 18 months prior (on sale!) so getting all of this in place and the dishes put away has freed up a ton of space in our house! Our cardboard recycling pile was huge this weekend.
Sunday, October 4, 2015
Sheetrock is Up


For the past few weeks the sheetrock got taped and then we spent the weekend painting. Tor's dad came over for a day last week and got the primer on nearly all the walls. I really dislike painting so any and all help with this project is much appreciated by me!
This weekend I focused on painting the kitchen some more. I finished up the primer and got ceiling paint on both the kitchen and mudroom ceiling. Tor's dad is coming by tomorrow too so by the end of the day we should have all the painting done on the main floor! (That is until we decide to have kids and turn the office space into a nursery.)
Sunday, October 4, 2015
Sheetrock is Up


Over the past week we had a crew in to hang the sheetrock. We decided to hire it out so that we could pick up the speed on the project. Unfortunately the crew didn't do the nicest job so there is a delay now while we figure out what to do. I like the white color versus the ugly yellow foam color much better though!
This shot shows where our accent wall will be. We are still deciding if we are going to hang maple flooring or plywood sheets here.
Sunday, September 13, 2015
Almost Ready for Sheetrock


This weekend was well spent at home. The focus was getting ready for the sheetrock in the kitchen. Our to do list is in the first picture. This isn't everyhting we worked on this weekend, but it's most of it. The following images are not all that exciting to look at, but know that a lot of prep work goes into getting everything lined up and ready before the room takes its final shape.
My jobs were to add insulation and caulking around the windows, nail down nailer plates, and as always be the acting foreman on the clean up crew. This doesn't sound like much, but it took almost all weekend. The insulaion is a messy business (I still have "Great Stuff" on my nails and hands that won't come off!) which means a lot of cleaning. I first had to tape all the windows with painters tape, fill the gaps with Great Stuff on the sides and top of the window, wait for it to dry, add caulking to the bottom gap, sheer off any excess insulation, then clean it all up and remove the tape. I did this on 3 doors and 10 windows. Oh and then vacuum for hours becase this stuff flakes everywhere!
Tor spent his time doing a lot of random things. The picture here is of the speaker wiring going into place.
He also ran wiring and installed a light at the bottom of the stairs to the basement, ran PVC through the walls to allow access to electrical wiring for the upstairs bathroom going in (pictures here), installed a few light fictures in the kitchen area, installed the heated floor thermostat case, prepped the area for the lighting over the dinning room table among other things. He was most excited about the light in the basement though because it is so dark down there when doing laundry. It felt great to be home all weekend and make some serious progress!
Monday, July 20, 2015
Camping in the Kitchen

The insulation has gone into the kitchen space and we passed the electical permit. We have been working hard since our last post, but most of it is small stuff that isn't great to photograph or write about. This picture is fun because it shows our new eating arrangement. It feels like we are camping all the time!
Sunday, May 31, 2015
Tossing the Old Kitchen


This project felt so good to get started. It actually started the day prior when Tor and his friend Erik took out all the cabinets and appliances. I was gone so there aren't any photos.
Here Tor is working on the old exterior wall. Some friends wanted to take the old wood to make something out of it so Tor took his time to take it down as nice as possible.
This is the view looking north within the kitchen. I am standing in the mudroom while taking this photo. His brother Erik (so many Erik’s I know) was helping out this day. My job was to sweep... sweep... sweep all day. Demo days are fun, but messy.
Here is the initial breakthrough to the new kitchen space.
Another shot of the progress.
The wall is almost all gone. Both good and bad... the wall wasn't really insulated which made it easy to clean up, but probably jacked up our heating and cooling bills for the past couple years.
This photo is from the new kitchen and looking into the old space. The old space will be where the table will be and the kitchen itself will be where I am standing.
Here Tor is working to dig up the rest of the tile. This was hard work and it was super hot in here too. The air is turned off since it needs to be rewired so we had some fans going. The fans were blowing up dust at the same time therefore we limited their use.
Sunday, November 9, 2014
Kitchen Roof Connection


The project for today was to finish up the roof framing that stretches back over the existing roof line and get the sheathing applied to the entire roof. The plan was a great one, but Mother Nature decided to step in and shake things up a bit.
Here is how we started out. Tor is assembling the framing in portions so that we can lift it on to the roof.
A few pieces of roof sheathing are on to help keep the framing stable. The project is to connect this to the existing house in the gap shown in the top right of this picture.
Here is a picture of me helping nail the framing in place.
This is a picture of the progress. There are two sections that have been placed in this photo. This process is very tricky and time consuming because we need to remove shingles from the existing house, build each section, lift into place and ensure they are level and straight to the house.
We worked the whole day to get this accomplished, but unfortunately we were not able to get the sheathing on. The worst part is what Mother Nature decided to do next... we had the first snowfall of the 2014 Minnesota winter season.
This is what the roofline looked like the next morning. Snow everywhere. Fortunately it wasn't a more than a few inches so it should be easy to clean off and keep working. The unfortunate part is that we had to remove shingles on the existing roof. This paired up with removing exterior wall and the overhang over the original kitchen has left a hole in our house. When this snow melts it will come straight in the wall. The good thing is that we will be taking down that section of the wall anyway when we gut the kitchen.
This picture was taken a few days later. Although it isn't waterproof, we were able to get the sheathing on the roof. This will help channel some water off the roof, but we will continue to get some more water into the house until we are able to shingle.
Saturday, November 8, 2014
Kitchen Sheathing
So daylight savings has ended which means that we are working in the dark. Summer is over, winter should be here any minute, and we still have a lot of work to do. We are still working on the kitchen and Tor has been hard at work trying to get it enclosed. I had to include this picture because it showcases the work environment so perfectly. Day or night, rain or shine... Tor is a busy bee.
Since the last update, we got some of the sheathing on. Tor and I worked together to get these up since there isn't anything for them to rest on.
This is the interior view of the kitchen in its current state. The large window will be right over the sink and on the left is a skyscraper window that will allow for some nice natural light. We wanted to add a few different kinds of windows so that the house doesn't look like a "cookie cutter" house anymore.
Well it finally happened. Tor shot his hand with the nail gun. He actually kept working for a while before he came in to tend to the cut. He pulled the nail out himself. I didn't take a picture of the gloves. Trust me, it is better that I didn't.
This is a quick shot to show how hard Tor is willing to work to get things done right. There is a ladder on the inside, but still. He crawls everywhere to ensure everything is perfectly in place and as it should be before he moves onto the next stage.
Without trying to beat a dead horse, here is another picture of Tor hard at work. I am really blessed to have met such a handy man. Who knew he would be so good at this stuff when I gave him my number on a napkin in a bar 6 years ago? I am lucky!
Here Tor and I have been working on getting the top sheathing in place. Tor got the little one up on the right by himself though.
Here is all of the sheathing finished. I helped with one of the middle parts while his dad helped with another one. His parents stopped over to check out the progress for a few minutes so his dad helped out a little. We are waiting to cut out the windows until we have them. It is supposed to snow tonight so we thought it best to keep the space enclosed for now.


Saturday, November 1, 2014
Framing


First off we want to give a big thank you to two good friends of ours that stopped by today and helped with this big project. We couldn't have gotten all of this done without you guys. Quite frankly, we wouldn't have gotten any of it done because it definitely took four people.
This is the south-facing wall. The big opening is for the sliding doors that will go out onto the deck. Tor actually got most of this wall framed earlier this week.
Tor took three 2 x 6's to make a post at each corner of the existing wall in preparation for the new walls.
In order to set these posts, Tor cut into the existing wall and nailed in each 2 x 6 individually under the header.
This is the north-facing wall with the post ready to go. All we need is the wall.
Before Hep came over to help, Tor framed the north-facing wall and had the posts all ready. Once Hep came, it was a mere few minutes to get both walls lifted and in place.
Here Tor is placing braces to help support the wall.
Hep helps make sure that everything is plumb.
Up goes the south-facing wall.
These are pretty heavy so I was surprised that I was able to sit it out and capture pictures.
Another shot of the guys lifting the wall up. It was fun getting some actual action shots during the process instead of just before and after shots.
After the walls were up, Shannon came to help with the roof trusses. These suckers were heavy and tricky to get into place. We could have used a few more people and a couple more ladders to make it a little easier, but it really wasn't that bad.
To get the first one up, Hep and Shannon carried it up the ladder while Tor helped hold in the center. The trusses are wider than the opening in the kitchen so it had to be shifted back and forth while weaving through the framing and across the braces.
Once the truss was on the walls, Tor crawled onto the roof and added braces to help hold it in place and keep it from rolling.
The second truss went up in a similar fashion. A 2 x 4 was added to the top of the roof to help brace the trusses.
The process got a little more refined by the third truss. Shannon used a 2 x 4 to help hold the center stable while Hep and Tor walked it up the ladder. I helped out by checking if it was plumb and holding it for a little extra support at the center. Tor is nailing it into place here.
This is a better picture of the three guys working together. Everything started to move pretty quickly at this point so I didn't get a picture of each truss going up.
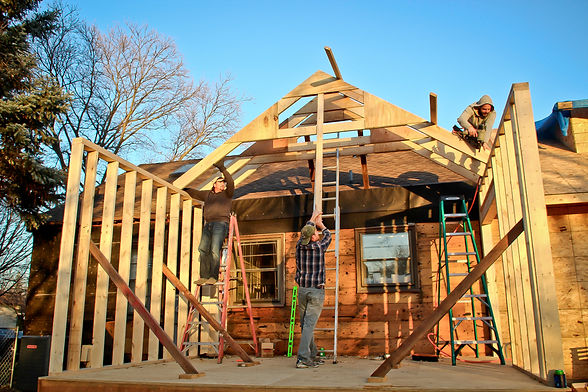
Here is the finished product. Two walls and seven roof trusses all in place.
This is looking north at the kitchen. Tor spent more time later this evening adding a few extra 2 x 4's to help brace the framing.
This is a cool view of the work done today. All seven trusses perfectly aligned and in place.
I couldn't resist taking a few pictures with the room lit up. It looks so cool with the sunset blue sky.
This is a great final picture for this post. It is by far my favorite photo of the day. Tor is working on adding a few more bracing pieces in since it has been windy lately. Pretty soon there will be a third wall and windows in place. Everything is ordered and ready to go so it should come together quickly!
Thursday, October 30, 2014
Building Roof Trusses


Yes it is true; we have finally started working on the kitchen. We hope to get the majority of the framing and sheathing done by the end of this weekend given that we have some nice fall weather coming our way. It seems that Mother Nature has been working to redeem herself after all the rain this past spring.
Tor spent the better part of Tuesday evening working on cutting all of the pieces for the roof trusses to size so that he could streamline the assembly process. He also had a few beers along the way.
This is just a picture of our usual lumber run. We have gotten more than a few funny looks as we drive on the freeway with this strapped to the top of the car. Our neighbors are getting used to it though despite the suggestions to buy an actual truck.
Ok back to business. Tor created a template on the kitchen subfloor to assemble the roof trusses. The template ensured that each truss was assembled precisely, resulting in 7 identical roof trusses. All of the pieces had been cut previously and we ensured for accuracy so that everything would go smooth. Tor's brother Erik came over to help a little as well.
Shown here is a glance at the template Tor created. He screwed down two scraps to the floor so that the two 2 x 8's can lie against them at the peak. He also drew lines on the subfloor to help guide where the plywood on the underside would get placed.
Here Tor is adhering the plywood gusset on the truss members.
Erik helps out too. Of course Tor critiqued his work.
After setting plywood gussets in the construction adhesive, everything was nailed together.
Here the second part of the form template. Tor also screwed two 2 x 6's into two corners of the subfloor framing creating a pocket to set the 2 x 8's of the trusses in.
They worked kind of late into the evening to make sure that all of the forms were finished by the end of the night. They didn't go past the noise ordinance though.
Here are 3 of the roof trusses completed and in the garage. I went inside at this point to make dinner and didn't get a picture of all of them completed.
Sunday, October 26, 2014
The Kitchen is Starting!


Tor worked this afternoon on prepping more for the kitchen. He took down the original overhang by cutting the rafter tails back to be flush with the end of the second floor joists.
He then cut back the actual roof a little to match as well.
This is a close up view of the work he has done. It is kind of crazy to cut into the house.
Tor had a friend of ours come over to help lift up the two LVLs and put them in place. There is one behind the other in this image. Tor is grabbing the lumber tomorrow night and is hoping to have this framed out by the end of next weekend. We will see!! My family will be visiting next weekend from out of town so we might be able to get some work done with the fresh sets of hands that haven't already had to help out on our house.
Sunday, July 20, 2014
Kitchen Floor


The kitchen floor is starting to get put down. It was a struggle for a little while because the foundation was unleveled by 1/4in so Tor was worried about how to get it lined up properly to the existing kitchen floor. I didn't get a great picture of the subfloor from above because most of the work so these will have to do.
The floor still has an area that is not completely covered by plywood because we are going to stager the plywood form the existing. We will do this so that there isn't a seam right along the transition from old to new. It almost looks like we got a new pool!
For fun I thought we would add a picture of our new gutter system. The gutter itself falls right on the new floor so in the meantime Tor created this so that the water would at least be led away from the house.
Sunday, July 13, 2014
Kitchen Floor


Tor worked on the kitchen floor for most of the day. He had picked up the lumber on Saturday while it was raining, but ran into problems when he discovered the crawlspace foundation wasn't level. He also uncovered some boards that were rotting under the stucco and had to replace them. The shop vac is pictured because there was about 3 inches of water in this space when he started work yesterday afternoon. He vacuumed up much of it and the sun did the rest of the work throughout the day today. It wouldn't be a job if it were easy I guess!
Here is the work he got done. This is where the floor will connect to the house.
Saturday, June 28, 2014
The Foundation is Going In


The foundation has begun for the garage and the kitchen. The crawlspace is coming along nicely. The picture doesn't do it justice in terms of size. In order to get to this stage, Tor had to take down some stucco where the foundation meets the house. This stucco is in much better shape compared to what the garage was like so it has been more difficult to take off.
Tor worked on the stucco again today in order to get it out of the way before the crawlspace was enclosed. He rented an electric jackhammer and spent about six hours taking the stucco off from the top of the foundation wall all around the house. It took longer than expected to do this because it started to rain (again) and because we had some family stop over to check the progress.
What was I doing during all of this you ask? I mowed the lawn, cleaned out some landscaping material that was pulled up during the excavation, and began picking up the stucco. These tasks aren't as flashy to photograph, but I assure you I am helping on this project as much as I can.
Lastly, look at those muscles work. :)
Sunday, June 15, 2014
Kitchen Excavation
This area is completely dug out because there will be a crawlspace under the kitchen. This is of course necessary here versus the garage because we will be heating the kitchen. We will use this area as storage. The crew actually dug deeper than they needed to which left the space only a few feet away from being a full height room.
We had gone back and forth originally on whether or not to make this a full basement area. We decided on making it a crawlspace since the house has little storage and the entrance to this area will be through our mechanical room (and to save some money too).
Tor just said yesterday though that it would have been nice to make it into a brew room. It is hard not going deeper when we are so close already!


